

If you’re interested in web scraping, Crawlee can help. It’s a fast, interactive scraping engine used by data scientists, developers, and researchers to gather web data. Crawlee is easy to set up and offers features like proxy rotation and session handling. These features are crucial for scraping large or dynamic websites without getting your IP address blocked, ensuring smooth and uninterrupted data collection.
In this tutorial, you’ll learn how to use Crawlee for web scraping. You’ll start with a basic web scraping example and progress to more advanced concepts, such as session management and scraping dynamic pages.
How to Web Scrape with Crawlee
Before beginning this tutorial, make sure you have the following prerequisites installed on your machine:
- Node.js
- npm
- Visual Studio Code
Basic Web Scraping with Crawlee
Once you have all your prerequisites, let’s start by scraping the Books to Scrape website, which is perfect for learning as it provides a simple HTML structure.
Open your terminal or shell and start by initializing a Node.js project with the following commands:
mkdir crawlee-tutorial
cd crawlee-tutorial
npm init -y
Then, install the Crawlee library with the following command:
npm install crawlee
To scrape data from any website effectively, you need to inspect the web page that you want to scrape to obtain the details of the website’s HTML tags. To do so, open the website in your browser and navigate to the Developer Tools by right-clicking anywhere on the web page. Then, click Inspect or Inspect Element:

The Elements tab should be active by default, and this tab represents the HTML layout of the web page. In this example, every single book displayed is placed in an article HTML tag with the class product_pod. Within each article, the book title is contained in an h3 tag. The actual title of the book is contained in the title attribute of the a tag located within the h3 element. The book price is located inside the tag p with class price_color:

Under the root directory of your project, create a file named scrape.js and add the following code:
   const { CheerioCrawler } = require('crawlee');

   const crawler = new CheerioCrawler({
       async requestHandler({ request, $ }) {
           const books = [];
           $('article.product_pod').each((index, element) => {
               const title = $(element).find('h3 a').attr('title');
               const price = $(element).find('.price_color').text();
               books.push({ title, price });
           });
           console.log(books);
       },
   });

   crawler.run(['https://books.toscrape.com/']);
In this code, you use CheerioCrawler from crawlee to scrape book titles and prices from https://books.toscrape.com/. The crawler fetches HTML content, extracts data from <article class="product_pod"> elements using a jQuery-like syntax, and logs the results to the console.
Once you’ve added the previous code to your scrape.js file, you can run the code with the following command:
node scrape.js
An array of book titles and prices should print to your terminal:
…output omitted…
  {
    title: 'The Boys in the Boat: Nine Americans and Their Epic Quest for Gold at the 1936 Berlin Olympics',
    price: '£22.60'
  },
  { title: 'The Black Maria', price: '£52.15' },
  {
    title: 'Starving Hearts (Triangular Trade Trilogy, #1)',
    price: '£13.99'
  },
  { title: "Shakespeare's Sonnets", price: '£20.66' },
  { title: 'Set Me Free', price: '£17.46' },
  {
    title: "Scott Pilgrim's Precious Little Life (Scott Pilgrim #1)",
    price: '£52.29'
  },
…output omitted…
Proxy Rotation with Crawlee
A proxy is the middleman between your computer and the internet. When you use a proxy, it sends your web requests to the proxy server, which forwards them to the targeted website. The proxy server sends back the response from the website, and the proxy hides your IP address and prevents you from getting rate-limited or IP banned.
Crawlee makes proxy implementation easy because it comes with built-in proxy handling, which efficiently handles retries and errors. Crawlee also supports a range of proxy configurations to implement rotating proxies.
In the following section, you’ll set up a proxy by first obtaining a valid proxy. Then, you’ll verify that your requests are going through the proxies.
Set Up a Proxy
Free proxies are generally not recommended because they can be slow and insecure, and they may not have the necessary support for sensitive web tasks. Instead, consider using Bright Data, a proxy service that is secure, stable, and reliable. It also offers free trials, so you can test it out before committing.
To use Bright Data, click the Start free trial button on their home page and fill in the required information to create an account.
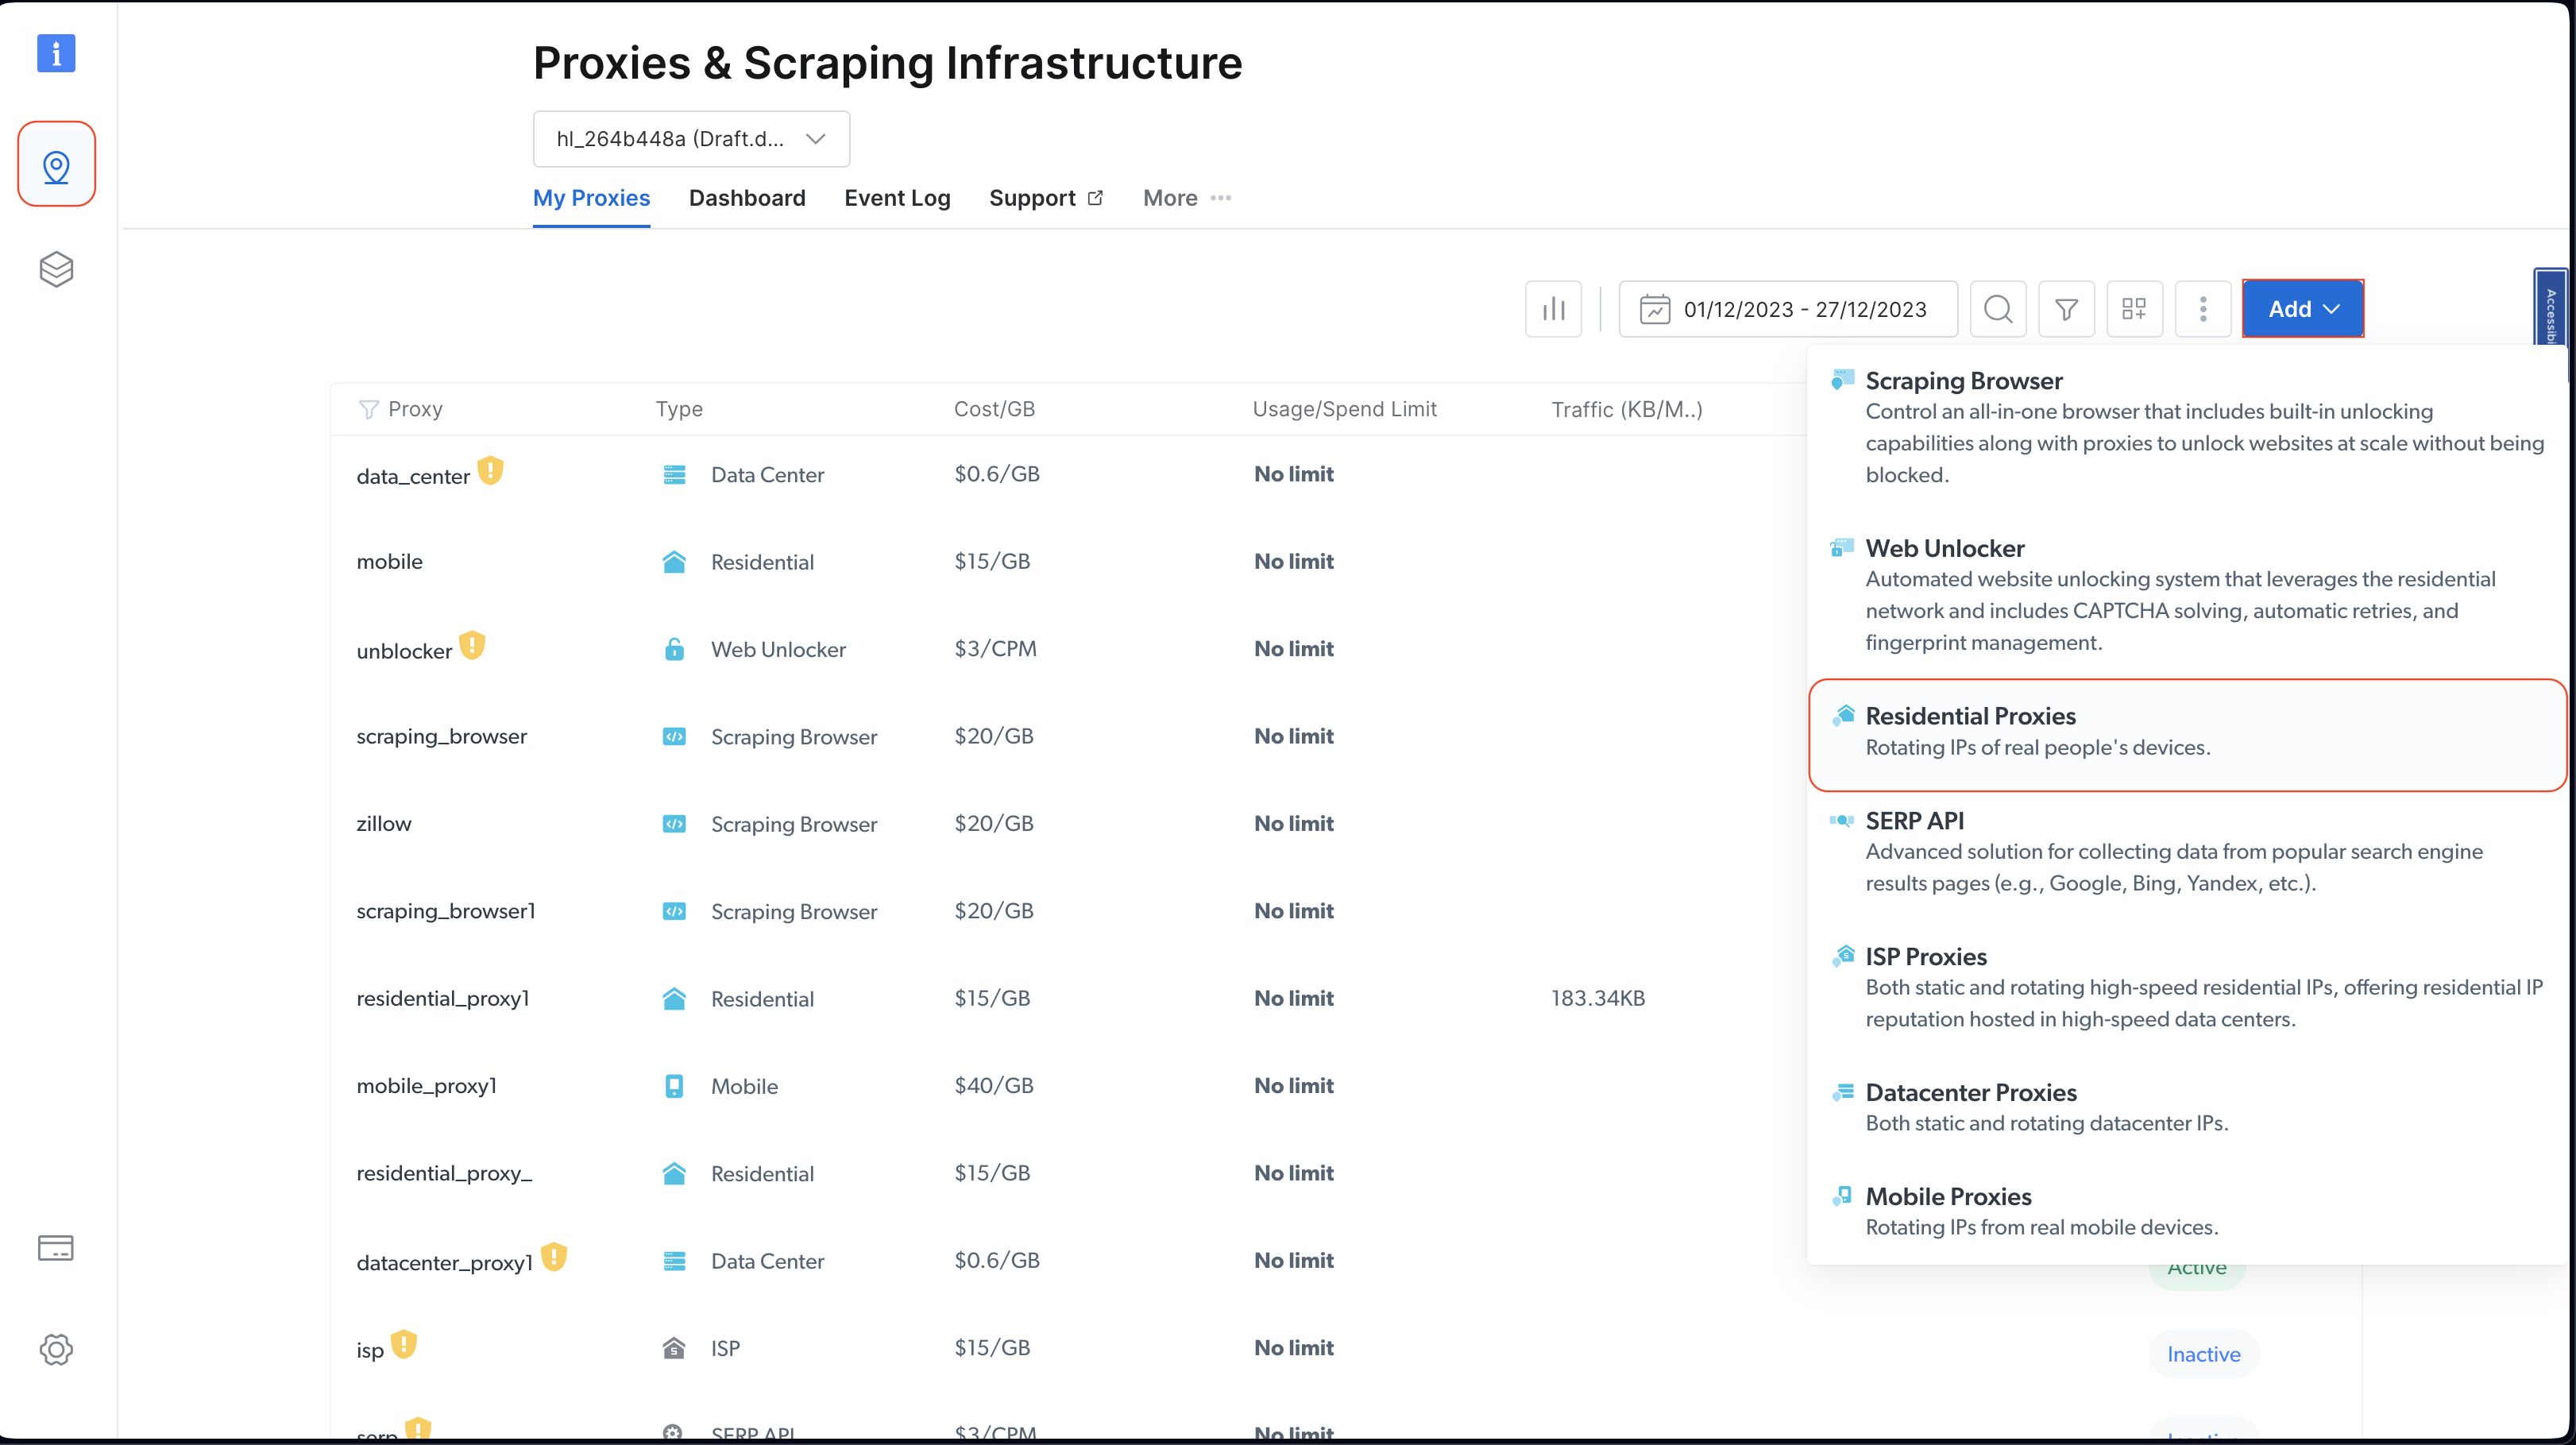
Once your account is created, log in to the Bright Data dashboard, navigate to Proxies & Scraping Infrastructure, and add a new proxy by selecting Residential Proxies:
Retain the default settings and finalize the creation of your residential proxy by clicking Add.
If you are asked to install a certificate, you can select Proceed without certificate. However, for production and real use cases, you should set up the certificate to prevent misuse if your proxy information is ever exposed.
Once created, take note of the proxy credentials, including the host, port, username, and password. You need these in the next step:

Under the root directory of your project, run the following command to install the axios library:
npm install axios
You use the axios library to make a GET request to http://lumtest.com/myip.json, which returns the details of the proxy that you’re using each time you run the script.
Next, under the root directory of your project, create a file named scrapeWithProxy.js and add the following code:
const { CheerioCrawler } = require("crawlee");
const { ProxyConfiguration } = require("crawlee");
const axios = require("axios");

const proxyConfiguration = new ProxyConfiguration({
  proxyUrls: ["http://USERNAME:PASSWORD@HOST:PORT"],
});

const crawler = new CheerioCrawler({
  proxyConfiguration,
  async requestHandler({ request, $, response, proxies }) {
    // Make a GET request to the proxy information URL
    try {
      const proxyInfo = await axios.get("http://lumtest.com/myip.json", {
        proxy: {
          host: "HOST",
          port: PORT,
          auth: {
            username: "USERNAME",
            password: "PASSWORD",
          },
        },
      });
      console.log("Proxy Information:", proxyInfo.data);
    } catch (error) {
      console.error("Error fetching proxy information:", error.message);
    }

    const books = [];
    $("article.product_pod").each((index, element) => {
      const title = $(element).find("h3 a").attr("title");
      const price = $(element).find(".price_color").text();
      books.push({ title, price });
    });
    console.log(books);
  },
});

crawler.run(["https://books.toscrape.com/"]);
Note: Make sure to replace the
HOST,PORT,USERNAME, andPASSWORDwith your credentials.
In this code, you’re using CheerioCrawler from crawlee to scrape information from https://books.toscrape.com/ using a specified proxy. You configure the proxy with ProxyConfiguration; then, you fetch and log proxy details using a GET request to http://lumtest.com/myip.json. Finally, you extract the book titles and prices using Cheerio’s jQuery-like syntax and log the scraped data to the console.
Now, you can run and test the code to ensure the proxies are working:
node scrapeWithProxy.js
You’ll see similar results to before, but this time, your requests are routed through Bright Data proxies. You should also see the details of the proxy logged in the console:
Proxy Information: {
  country: 'US',
  asn: { asnum: 21928, org_name: 'T-MOBILE-AS21928' },
  geo: {
    city: 'El Paso',
    region: 'TX',
    region_name: 'Texas',
    postal_code: '79925',
    latitude: 31.7899,
    longitude: -106.3658,
    tz: 'America/Denver',
    lum_city: 'elpaso',
    lum_region: 'tx'
  }
}
[
  { title: 'A Light in the Attic', price: '£51.77' },
  { title: 'Tipping the Velvet', price: '£53.74' },
  { title: 'Soumission', price: '£50.10' },
  { title: 'Sharp Objects', price: '£47.82' },
  { title: 'Sapiens: A Brief History of Humankind', price: '£54.23' },
  { title: 'The Requiem Red', price: '£22.65' },
…output omitted..
If you run the script again with node scrapingWithBrightData.js, you should see a different IP address location used by the Bright Data proxy server. This validates that Bright Data rotates locations and IPs each time you run your scraping script. This rotation is important to bypass blockages or IP bans from the targeted websites.
Note: In the
proxyConfiguration, you could have passed different proxy IPs, but since Bright Data does that for you, you don’t need to specify the IPs.
Sessions Management with Crawlee
Sessions help maintain state across multiple requests, which is useful for websites that use cookies or login sessions.
To manage a session, create a file named scrapeWithSessions.js under the root directory of your project and add the following code:
const { CheerioCrawler, SessionPool } = require("crawlee");

(async () => {
  // Open a session pool
  const sessionPool = await SessionPool.open();

  // Ensure there is a session in the pool
  let session = await sessionPool.getSession();
  if (!session) {
    session = await sessionPool.createSession();
  }

  const crawler = new CheerioCrawler({
    useSessionPool: true, // Enable session pool
    async requestHandler({ request, $, response, session }) {
      // Log the session information
      console.log(`Using session: ${session.id}`);

      // Extract book data and log it (for demonstration)
      const books = [];
      $("article.product_pod").each((index, element) => {
        const title = $(element).find("h3 a").attr("title");
        const price = $(element).find(".price_color").text();
        books.push({ title, price });
      });
      console.log(books);
    },
  });

  // First run
  await crawler.run(["https://books.toscrape.com/"]);
  console.log("First run completed.");

  // Second run
  await crawler.run(["https://books.toscrape.com/"]);
  console.log("Second run completed.");
})();
Here, you’re using the CheerioCrawler and SessionPool from crawlee to scrape data from https://books.toscrape.com/. You initialize a session pool, and then you configure the crawler to utilize this session. The requestHandler function logs the session information and extracts book titles and prices using Cheerio’s jQuery-like selectors. The code does two consecutive scraping runs and logs the session ID on each run.
Run and test the code to validate that different sessions are being used:
node scrapeWithSessions.js
You should see similar results as before, but this time, you should also see the session ID for each run:
Using session: session_GmKuZ2TnVX
[
  { title: 'A Light in the Attic', price: '£51.77' },
  { title: 'Tipping the Velvet', price: '£53.74' },
…output omitted…
Using session: session_lNRxE89hXu
[
  { title: 'A Light in the Attic', price: '£51.77' },
  { title: 'Tipping the Velvet', price: '£53.74' },
…output omitted…
If you run the code again, you should see that a different session ID is being used.
Dynamic Content Handling with Crawlee
If you’re dealing with dynamic websites (ie websites that come with content populated by JavaScript), web scraping can be extremely challenging because you need to render JavaScript to access the data. To handle these situations, Crawlee integrates with Puppeteer, which is a headless browser that can render JavaScript and interact with the targeted website just like a human would.
To demonstrate this functionality, let’s scrape content from this YouTube page. As always, before scraping anything, make sure you review the rules and terms of service for that page.
After reviewing the terms of service, create a file named scrapeDynamicContent.js under the root directory of your project and add the following code:
const { PuppeteerCrawler } = require("crawlee");

async function scrapeYouTube() {
  const crawler = new PuppeteerCrawler({
    async requestHandler({ page, request, enqueueLinks, log }) {
      const { url } = request;
      await page.goto(url, { waitUntil: "networkidle2" });

      // Scraping first 10 comments
      const comments = await page.evaluate(() => {
        return Array.from(document.querySelectorAll("#comments #content-text"))
          .slice(0, 10)
          .map((el) => el.innerText);
      });

      log.info(`Comments: ${comments.join("n")}`);
    },

    launchContext: {
      launchOptions: {
        headless: true,
      },
    },
  });

  // Add the URL of the YouTube video you want to scrape
  await crawler.run(["https://www.youtube.com/watch?v=wZ6cST5pexo"]);
}

scrapeYouTube();
Then, run the code with the following command:
node scrapeDynamicContent.js
In this code, you use the PuppeteerCrawler from the Crawlee library to scrape YouTube video comments. You start by initializing a crawler that navigates to a specific YouTube video URL and waits for the page to fully load. Once the page is loaded, the code evaluates the page content to extract the first ten comments by selecting elements with the specified CSS selector #comments #content-text. The comments are then logged in the console.
Your output should include the first ten comments related to the selected video:
INFO  PuppeteerCrawler: Starting the crawler.
INFO  PuppeteerCrawler: Comments: Who are you rooting for?? US Marines or Ex Cons
Bro Mateo is a beast, no lifting straps, close stance.
ex convict doing the pushups is a monster.
I love how quick this video was, without nonsense talk and long intros or outros
"They Both have combat experience" is wicked
That military guy doing that deadlift is really no joke.. ...
One lives to fight and the other fights to live.
Finally something that would test the real outcome on which narrative is true on movies
I like the comradery between all of them. Especially on the Bench Press ... Both team members quickly helped out on the spotting to protect from injury. Well done.
I like this style, no youtube funny business. Just straight to the lifts
…output omitted…
You can find all the code used in this tutorial on GitHub.
Conclusion
In this article, you learned how to use Crawlee for web scraping, and you saw how it can help improve the efficiency and reliability of your web scraping projects.
Remember to always respect the target website’s robots.txt file and terms of service when scraping data.
Ready to elevate your web scraping projects with professional-grade data, tools, and proxies? Explore the comprehensive web scraping platform of Bright Data, offering ready-to-use datasets and advanced proxy services to streamline your data collection efforts.
Sign up now and start your free trial!


