

HtmlUnit is a headless browser that allows you to model HTML pages. After modeling the page programmatically, you can interact with it by performing tasks such as completing forms, submitting them, and navigating between pages. It can be utilized for web scraping to extract data for subsequent manipulation as well as for creating automated tests to verify that your program creates web pages as expected.
Web Scraping with HtmlUnit
To implement web scraping using HtmlUnit and Gradle, IntelliJ IDEA IDE will be used; however, you can use any IDE or code editor you prefer.
IntelliJ supports fully functioning integration with Gradle and can be downloaded on the JetBrains site. Gradle is a build automation tool that supports building and creating packages for your application. It also allows you to add and manage dependencies seamlessly. Gradle and Gradle extensions are installed and enabled by default in the latest IntelliJ IDEA versions.
All the code for this tutorial can be found in this GitHub repo.
Create a Gradle Project
To create a new Gradle project in IntelliJ IDE, select File > New > Project from the menu options, and a new project wizard will be opened. Enter the name of the project and select the desired location:

You need to select the Java language since you’re going to create a web scraping application in Java using HtmlUnit. In addition, select the Gradle build system. Then click Create. This will create a Gradle project with a default structure and all the necessary files. For example, the build.gradle file contains all the dependencies necessary for building this project:

Install HtmlUnit
To install HtmlUnit as a dependency, open the Dependencies window by selecting View > Tool Windows > Dependencies.
Then search for “htmlunit” and select Add:

You should be able to see that HtmlUnit was installed in the dependencies section of the build.gradle file:

Now that you’ve installed HtmlUnit, it’s time to scrape data from static and dynamic web pages.
Scrape a Static Page
In this section, you’ll learn how to scrape HtmlUnit Wiki, a static web page. This web page contains elements such as the title, table of contents, list of subheadings, and content for each subheading.
Each element in an HTML web page has attributes. For example, ID is an attribute that uniquely identifies an element in the complete HTML document, and Name is an attribute that identifies that element. The Name attribute is not unique, and more than one element in the HTML document can have the same name. The elements in a web page can be identified using any of the attributes.
Alternatively, you can also identify elements using its XPath. XPath uses path-like syntax to identify and navigate elements in the web page’s HTML.
You’ll use both of these methods to identify the elements in the HTML page in the following examples.
To scrape a web page, you need to create an HtmlUnit WebClient. The WebClient represents a browser inside your Java application. Initializing a WebClient is similar to launching a browser to view the web page.
To initialize a WebClient, use the following code:
WebClient webClient = new WebClient(BrowserVersion.CHROME);This code initializes the Chrome browser. Other browsers are also supported.
You can get the web page using the getPage() method available in the webClient object. Once you have the web page, you can scrape the data from the web page using various methods.
To get the page title, use the getTitleText() method, as demonstrated in the following code:
String webPageURl = "https://en.wikipedia.org/wiki/HtmlUnit";
        try {

            HtmlPage page = webClient.getPage(webPageURl);

            System.out.println(page.getTitleText());

        } catch (FailingHttpStatusCodeException | IOException e) {

            e.printStackTrace();

        }
The title of the page will then be printed:
HtmlUnit - WikipediaTo take this a step further, let’s fetch all the H2 elements available on the web page. In this instance, H2s are available in two sections of the page:
- On the left sidebar, where the contents are displayed: As you can see, the heading of the Contents section is an H2 element.
- In the main body of the page: All the subheadings are H2 elements.

To fetch all the H2s in the content body, you can use the XPath of the H2 elements. To find the XPath, right-click on any H2 element and select Inspect. Then right-click on the highlighted element and select Copy > Copy full XPath:
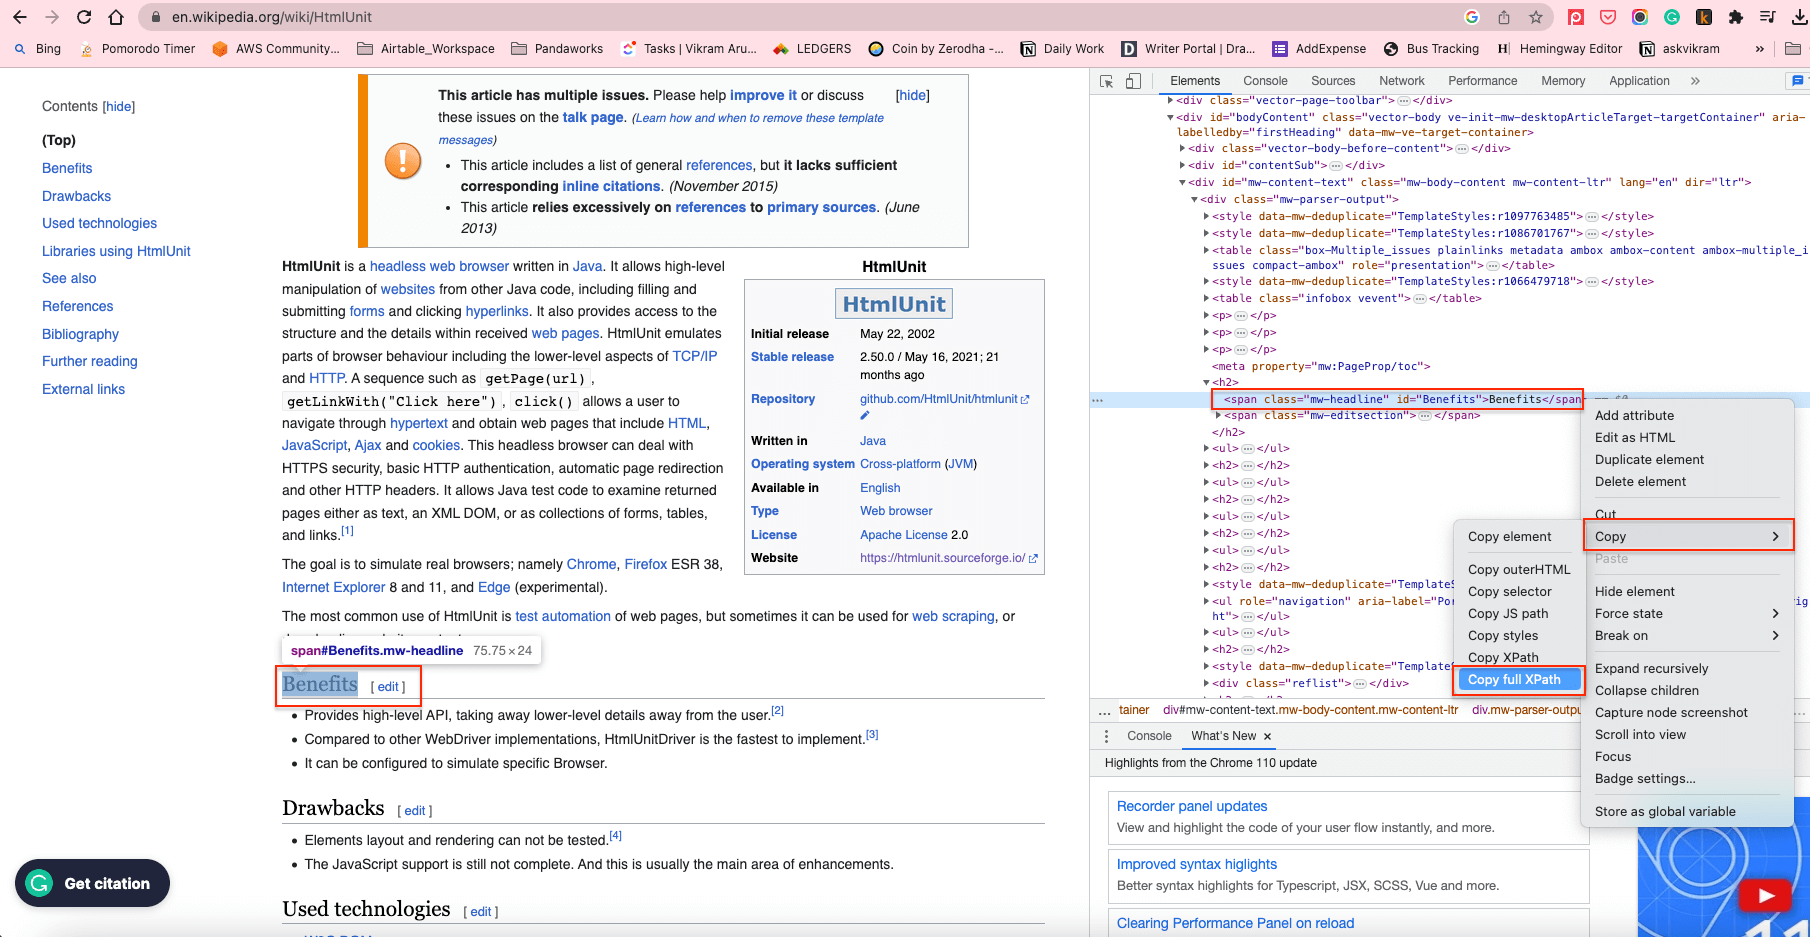
This will copy the XPath to the clipboard. For example, the XPath element of the H2s in the content body is /html/body/div[1]/div/div[3]/main/div[2]/div[3]/div[1]/h2.
To get all the H2 elements using their XPath, you can use the getByXpath() method:
String xPath = "/html/body/div[1]/div/div[3]/main/div[2]/div[3]/div[1]/h2";

 String webPageURL = "https://en.wikipedia.org/wiki/HtmlUnit";

        try {
            HtmlPage page = webClient.getPage(webPageURL);

            //Get all the headings using its XPath+
            List<HtmlHeading2>  h2 = (List<HtmlHeading2>)(Object) page.getByXPath(xPath);

            //print the first heading text content
            System.out.println((h2.get(0)).getTextContent());

        } catch (FailingHttpStatusCodeException | IOException e) {

            e.printStackTrace();

        }
The text content of the first H2 element will be printed as follows:
Benefits[edit]Similarly, you can get the elements via its ID using the getElementById() method, and you can get the elements using its name via the getElementByName() method.
In the following section, you’ll use these methods to scrape a dynamic web page.
Scrape a Dynamic Web Page Using HtmlUnit
In this section, you’ll learn about the form-filling and button-clicking capabilities of HtmlUnit by filling out the login form and submitting it. You’ll also learn how to navigate web pages using the headless browser.
To help demonstrate dynamic web scraping, let’s use the Hacker News website. Here’s what the login page looks like:

The following code is the HTML form code for the previous page. You can get this code by right-clicking on the Login Label and clicking Inspect:
<form action="login" method="post">
<input type="hidden" name="goto" value="news">
<table border="0">
<tbody>
<tr><td>username:</td><td><input type="text" name="acct" size="20" autocorrect="off" spellcheck="false" autocapitalize="off" autofocus="true"></td></tr>
<tr><td>password:</td><td><input type="password" name="pw" size="20"></td></tr></tbody></table><br>
<input type="submit" value="login"></form>
To fill the form using HtmlUnit, get the web page using the webClient object. The page contains two forms: Login and Create Account. You can get the login form using the getForms().get(0) method. Alternatively, you can use the getFormByName() method if the forms have a unique name.
Next, you need to get the form inputs (ie the username and password fields) using the getInputByName() method and the name attribute.
Set the username and password value in the input fields using the setValueAttribute() method and get the Submit button using the getInputByValue() method. You can also click the button using the click() method.
Once the button is clicked, and if the login is successful, the Submit button’s target page will be returned as the HTMLPage object, which can be used for further operations.
The following code demonstrates how to get the form, fill it out, and submit it:
HtmlPage page = null;

String webPageURl = "https://en.wikipedia.org/wiki/HtmlUnit";

        try {
            // Get the first page

            HtmlPage signUpPage = webClient.getPage(webPageURL);

            // Get the form using its index. 0 returns the first form.
            HtmlForm form = signUpPage.getForms().get(0);

            //Get the Username and Password field using its name
            HtmlTextInput userField = form.getInputByName("acct");
            HtmlInput pwField = form.getInputByName("pw");

            //Set the User name and Password in the appropriate fields
            userField.setValueAttribute("draftdemoacct");
            pwField.setValueAttribute("test@12345");

            //Get the submit button using its Value
            HtmlSubmitInput submitButton = form.getInputByValue("login");

            //Click the submit button, and it'll return the target page of the submit button
            page = submitButton.click();


        } catch (FailingHttpStatusCodeException | IOException e) {
            e.printStackTrace();
        }
Once the form is submitted and the login successful, you’ll be taken to the user’s home page, where the username is displayed in the right corner:

The user name element has the ID “me”. You can get the username using the getElementById() method and pass the ID “me” as demonstrated in the following code:
System.out.println(page.getElementById("me").getTextContent());The username from the web page is scraped and displayed as output:
draftdemoacctNext, you need to navigate to the second page of the Hacker News site by clicking the More hyperlink button at the end of the page:

To get the More button object, get the XPath of the More button using the Inspect option and get the first link object using the index 0:

Click the More link using the click() method. The link will be clicked, and the link’s target page will be returned as an HtmlPage object:
HtmlPage nextPage = null;

        try {
            List<HtmlAnchor> links = (List<HtmlAnchor>)(Object)page.getByXPath("html/body/center/table/tbody/tr[3]/td/table/tbody/tr[92]/td[2]/a");

            HtmlAnchor anchor =  links.get(0);

            nextPage = anchor.click();

        } catch (IOException e) {
            throw new RuntimeException(e);
        }
At this point, you should have the second page in the HtmlPage object.
You can print the HtmlPage‘s URL to check if the second page was loaded successfully:
System.out.println(nextPage.getUrl().toString());Following is the URL of the second page:
https://news.ycombinator.com/news?p=2Each page on the Hacker News site has thirty entries in it. This is why the entries on the second page start with serial number 31.
Let’s retrieve the ID of the first entry on the second page and see if it equals 31. Like before,
get the XPath of the first entry using the Inspect option. Then get the first entry from the list and display its text content:
String firstItemId = null;

        List<Object> entries = nextPage.getByXPath("/html/body/center/table/tbody/tr[3]/td/table/tbody/tr[1]/td[1]/span");

        HtmlSpan span = (HtmlSpan) (entries.get(0));

        firstItemId = span.getTextContent();

        System.out.println(firstItemId);
The ID of the first entry is now displayed:
31.This code shows you how to fill out the form, click the buttons, and navigate through web pages using HtmlUnit.
Conclusion
In this article, you learned how to scrape static and dynamic websites with HtmlUnit. You also learned about some of HtmlUnit’s advanced capabilities by scraping web pages and converting them into structured data.
While doing this with an IDE like IntelliJ IDEA, you need to find element attributes by inspecting them manually and write scraping functions from scratch using the element attributes. In comparison, the Serverless Functions from Bright Data provides robust unblocking proxy infrastructure, handy scraping functions, and code templates for popular websites. An efficient proxy infrastructure is necessary when it comes to scraping a web page without any IP-blocking and rate-limiting issues. Proxying also helps in emulating a user from a different geolocation.
Talk to one of Bright Data’s experts and find the right solution for your business, or simply register and explore the available products.


